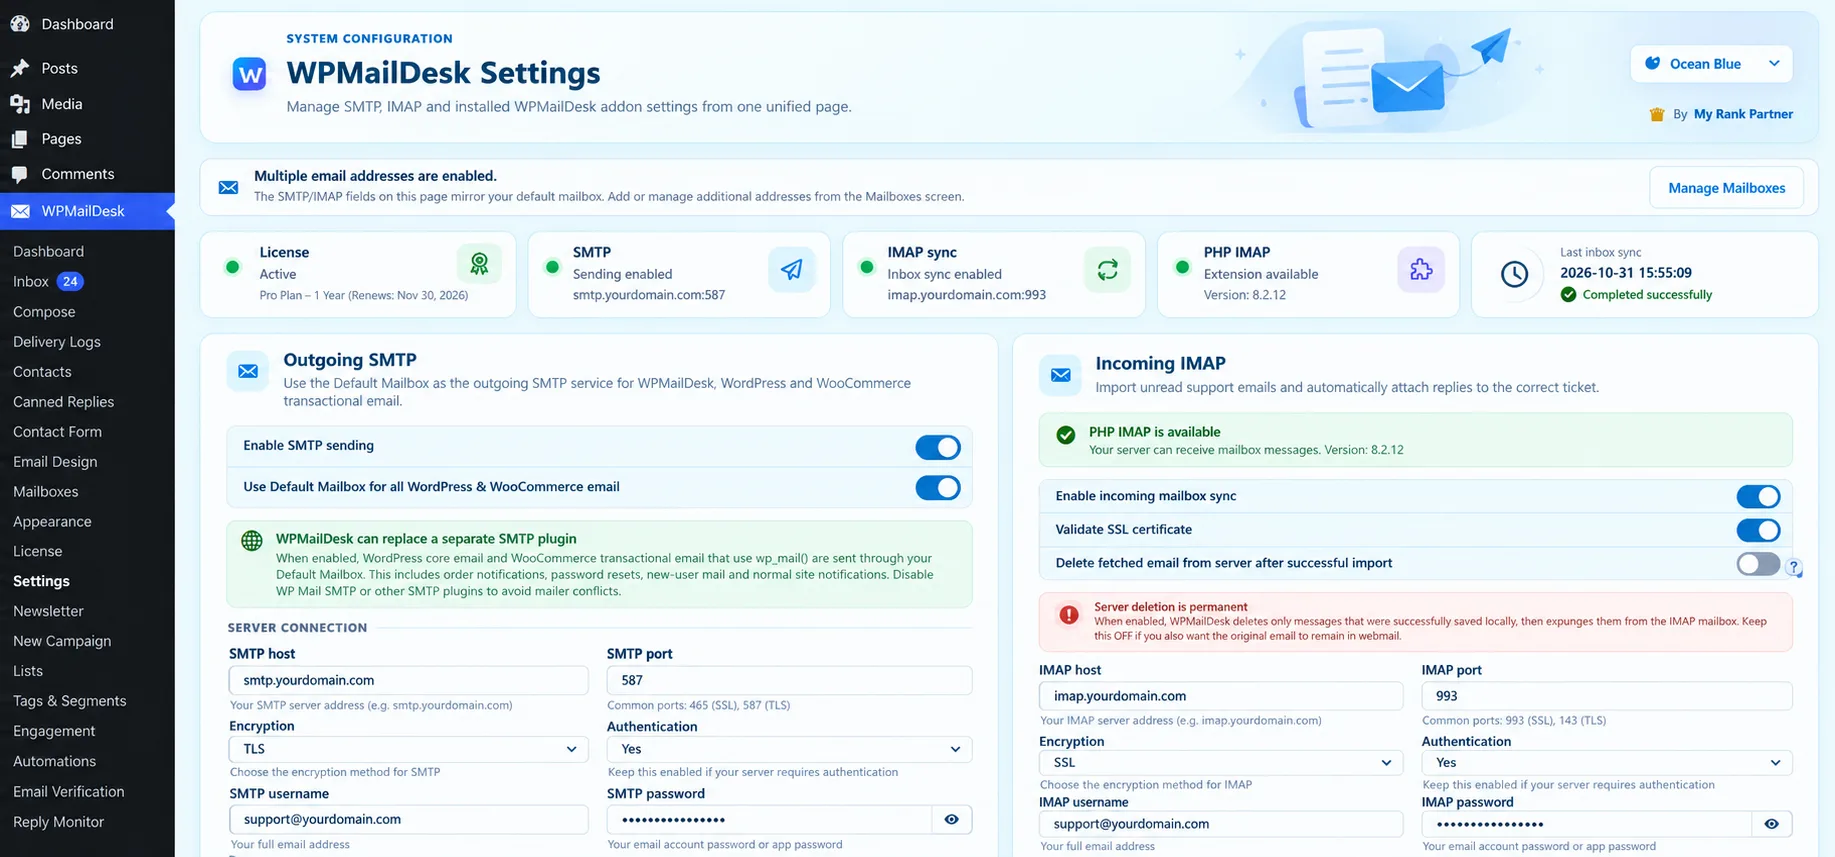
WPMailDesk Settings brings outgoing email, incoming mailbox connections, and support ticket automation into one configuration page. This is where you control how WordPress sends messages, how WPMailDesk receives customer emails, and what happens when a new support request arrives.
The Settings page is divided into two main areas: Outgoing SMTP and Incoming IMAP. You can configure these independently or use them together to build a complete email-based support workflow.
For example, a customer emails your support address. IMAP allows WPMailDesk to retrieve the incoming message, the help desk creates or updates the appropriate ticket, and SMTP handles outgoing replies and notifications.
This tutorial walks through every setting shown in the WPMailDesk Settings screen, including the connection details, mailbox schedule, automated acknowledgements, DMARC report filtering, and sync results.
Before You Configure WPMailDesk Settings
Before changing the settings, make sure WPMailDesk is installed and activated on your WordPress website.
You will also need access to the email account that you want to connect. Your email hosting provider should supply the connection details, including:
- SMTP server hostname and port.
- IMAP server hostname and port.
- Encryption method supported by the server.
- Full mailbox email address.
- Mailbox password or an app-specific password if required.
For this tutorial, we will refer to the example mailbox sales@example shown in the settings screenshot.
These values demonstrate the configuration of one mailbox. Do not copy the example server addresses or credentials unless they belong to your own email hosting account.
Step 1: Open WPMailDesk Settings
Log in to your WordPress administration dashboard.
From the WordPress sidebar, open:
WPMailDesk → Settings
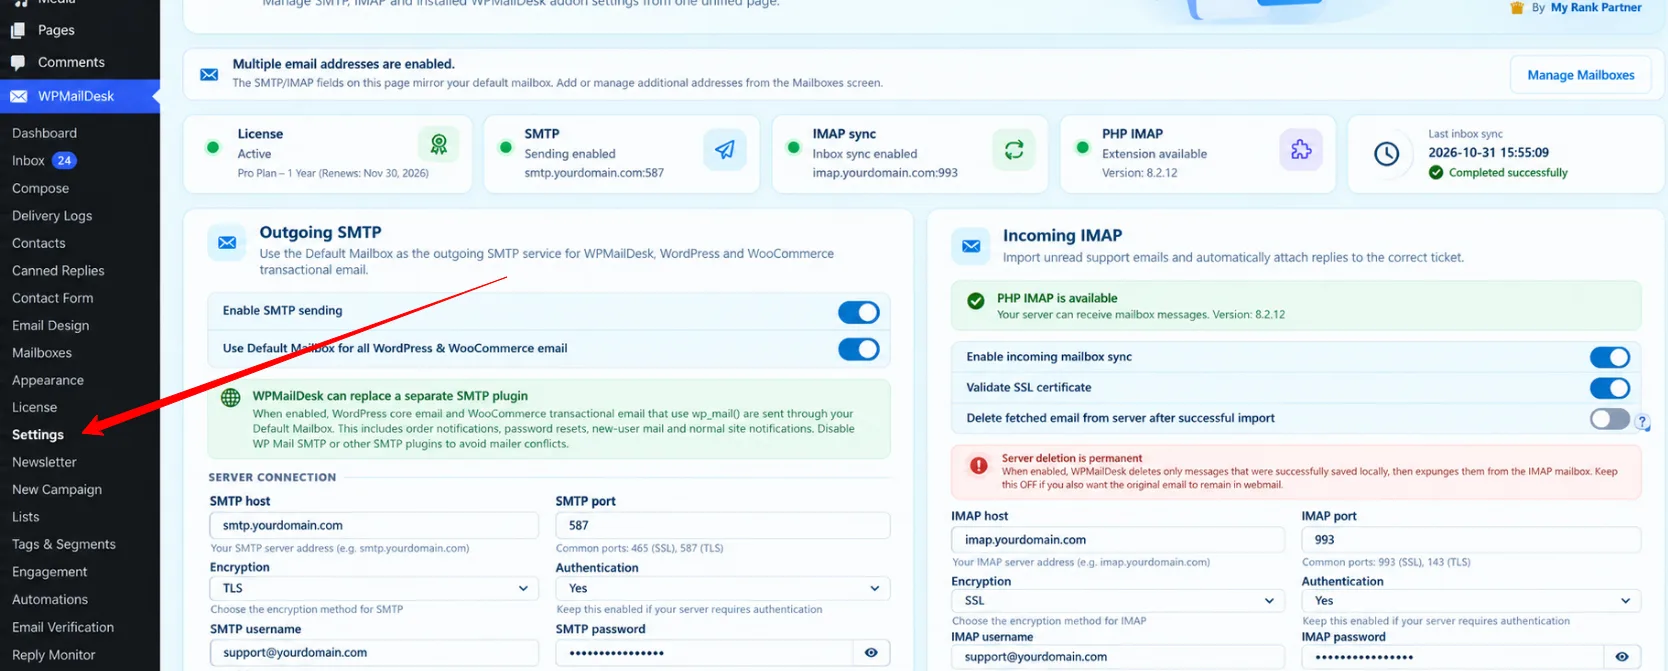
The page opens with the WPMailDesk Settings heading and the description explaining that SMTP, IMAP, and installed addon settings can be managed from one unified page.
The top-right area also includes an interface appearance selector. In the screenshot, the selected appearance is Ocean Blue. This controls the settings interface appearance rather than your SMTP or IMAP server credentials.
Before editing the connection fields, review the status cards near the top of the page.
Step 2: System Status Cards
WPMailDesk displays five cards that give you a quick overview of the current configuration.
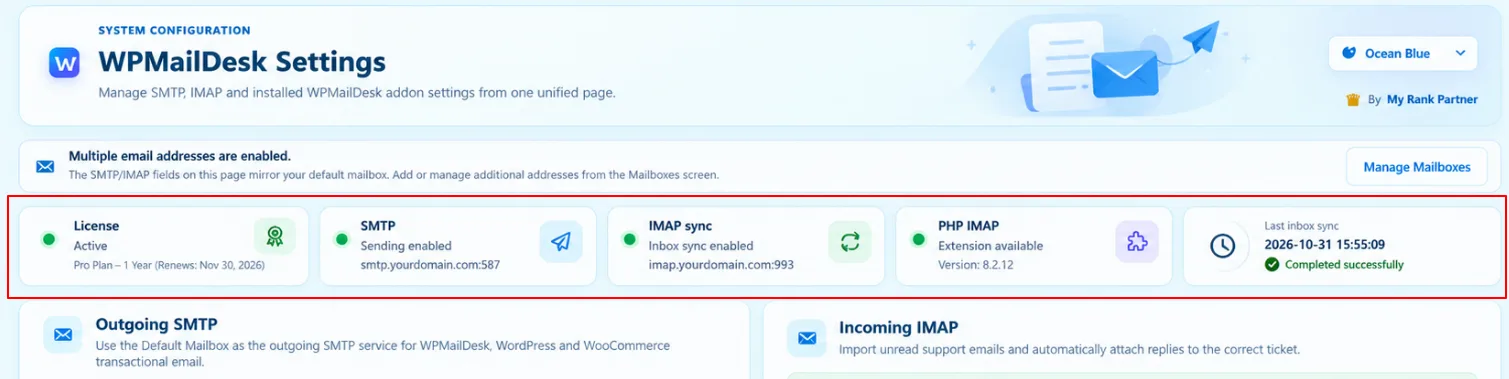
License
Screenshot status: Active
This indicates that the WPMailDesk license is recognized as active.
If the license is not active, review the license configuration before troubleshooting features that require an active license.
An active license does not, by itself, confirm that an SMTP or IMAP connection is working.
SMTP
Screenshot status: Sending enabled
This tells you that SMTP sending is enabled in WPMailDesk.
You should still verify the actual server connection by sending a test message after saving your settings.
IMAP Sync
Screenshot status: Inbox sync enabled
This means WPMailDesk is configured to retrieve incoming messages from the connected mailbox.
If inbox syncing is disabled, incoming email will not be retrieved through that configured sync feature.
PHP IMAP
Screenshot status: Extension available
WPMailDesk uses PHP’s IMAP functionality to access incoming mailbox messages.
When the PHP IMAP extension is available, the server has the required PHP capability for that connection method.
If the extension is missing, you may need to ask your hosting provider to enable it for the PHP version used by your WordPress website.
Last Inbox Sync
Screenshot example: 2026-10-31 12:55:10
This field displays the most recently recorded inbox synchronization time.
It is useful when checking whether the mailbox has been processed recently. The timestamp is a historical sync record, not a guarantee that new messages were imported successfully.
To understand what happened during the latest sync, review the detailed results at the bottom of the IMAP settings panel.
Step 3: Multiple Email Address Management
Above the status cards, WPMailDesk displays the notice:
Multiple email addresses are enabled.
This indicates that the installation supports more than one configured mailbox.
The notice also explains that the SMTP and IMAP fields displayed on the Settings page mirror the Default Mailbox.
For example, you might use different addresses for different business functions:
| Email address | Purpose |
|---|---|
| support@example.com | Customer support requests |
| sales@example.com | Sales inquiries |
| billing@example.com | Billing and payment questions |
To configure additional email accounts, click Manage Mailboxes.
Use the Mailboxes screen to add or manage those addresses and identify the appropriate default mailbox.
Important: When multiple mailboxes are enabled, do not assume that changing the main Settings page updates every additional mailbox. The fields shown here represent the default mailbox.
For your first installation, configure and test one mailbox before introducing more accounts.
Step 4: Configure Outgoing SMTP
The Outgoing SMTP panel appears on the left side of the Settings page.
SMTP handles outgoing email. WPMailDesk can use the Default Mailbox as the sending service for WPMailDesk messages and, when the appropriate option is enabled, WordPress and WooCommerce transactional emails.
Enable SMTP Sending
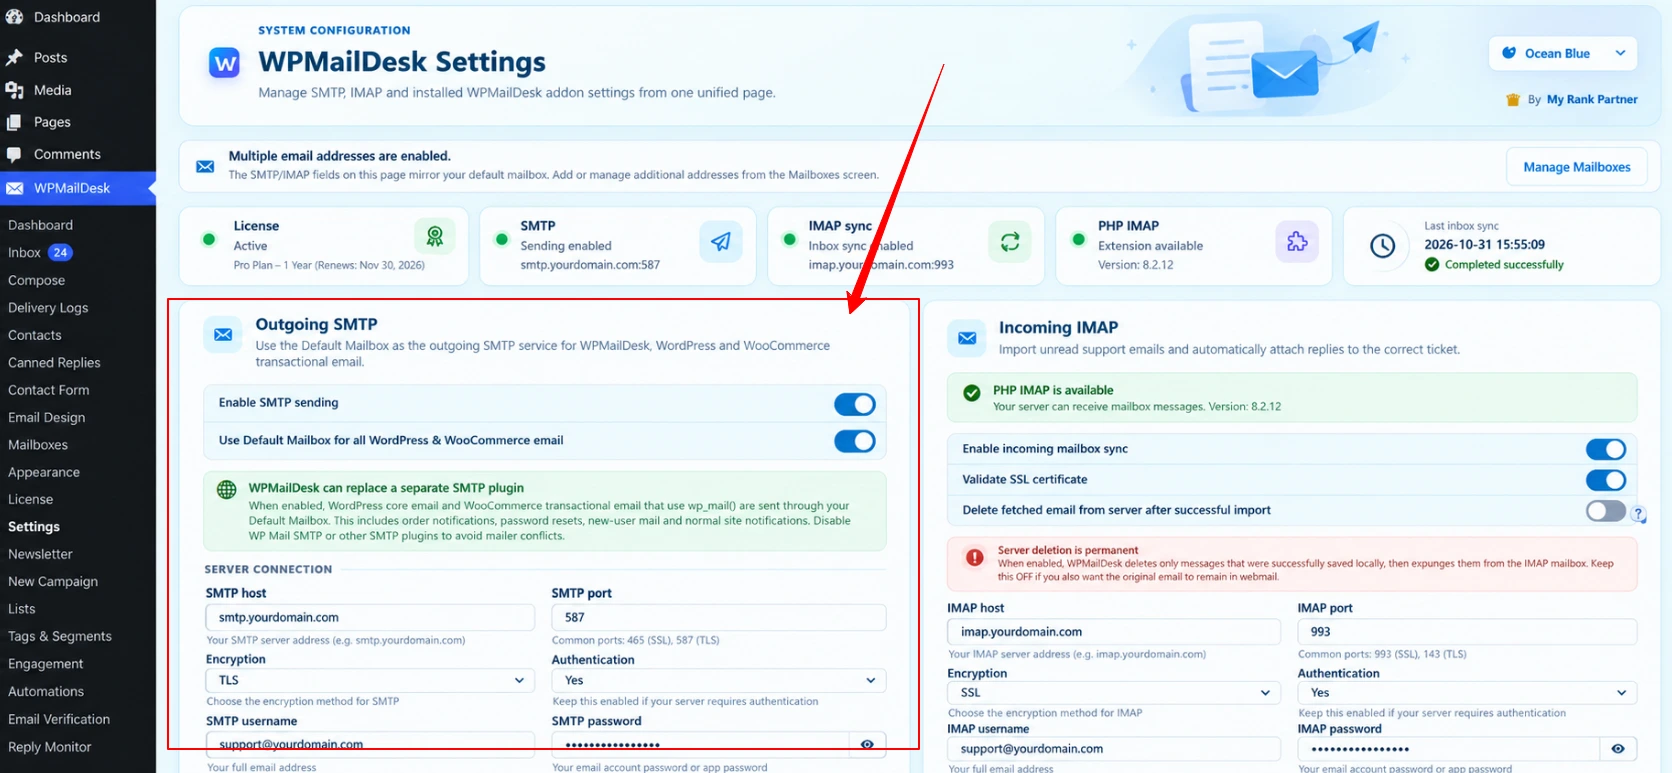
Turn on Enable SMTP sending when you want WPMailDesk to send email through your configured SMTP server.
This allows outgoing messages to use your email hosting provider’s authenticated sending connection.
If SMTP sending is disabled, this WPMailDesk SMTP configuration is not used for outgoing delivery.
For most setups where WPMailDesk is responsible for sending support replies, this option should be enabled.
Use Default Mailbox for All WordPress and WooCommerce Email

This option allows WPMailDesk to use the Default Mailbox for supported WordPress core and WooCommerce transactional messages that use WordPress’s wp_mail() function.
Examples include:
- WordPress password reset messages.
- New-user registration notifications.
- WooCommerce order notifications.
- Other supported transactional emails sent through
wp_mail().
This is useful when you want one SMTP configuration to handle both WPMailDesk messages and ordinary WordPress emails.
However, you should check whether another SMTP plugin is already installed.
The settings screen specifically warns that WPMailDesk can replace a separate SMTP plugin. Running two plugins that both control WordPress email delivery can cause conflicts.
If you decide to use WPMailDesk as the main SMTP service, review and disable conflicting SMTP configurations after confirming WPMailDesk can send successfully.
An email system that bypasses wp_mail() may continue using its own sending method.
Step 5: Enter SMTP Server Connection Details
Under Server Connection, you will see the fields required to establish the outgoing mail connection.
SMTP Host

The SMTP Host is the server address used to send outgoing email.
Enter the hostname provided by your email hosting company.
For example, your provider might supply a hostname similar to smtp.example.com.
Do not enter your website URL or your email address into this field unless the provider explicitly instructs you to use that value.
SMTP Port

The SMTP Port identifies the server port used for outgoing mail.
Common configurations include:
| SMTP port | Common use |
|---|---|
| 465 | Implicit TLS, often labelled SSL/SMTPS |
| 587 | SMTP submission using STARTTLS |
For the connection shown in the screenshot, port 465 is paired with SSL/SMTPS.
Use the port and encryption pairing supplied by your email host. Changing one without adjusting the other can prevent the connection from working.
Encryption

The Encryption field controls the connection security method.
SSL/SMTPS establishes a protected connection when connecting to the server, while STARTTLS upgrades an existing SMTP connection to an encrypted connection.
Select the method supported by your provider.
For the screenshot example, the configuration is:
SMTP Host: smtp.stackmail.com
SMTP Port: 465
Encryption: SSL/SMTPS
These three values must work together.
Username

The SMTP Username identifies the mailbox account used to authenticate with the mail server.
For many email hosting providers, this is the complete email address.
Enter the mailbox login provided by your host rather than your WordPress administrator username.
SMTP Authentication

SMTP authentication allows WPMailDesk to authenticate with the outgoing mail server using the configured credentials.
Most hosted mailbox services require SMTP authentication.
Keep it enabled unless your mail provider specifically instructs you to use an unauthenticated connection.
Password
The SMTP Password field stores the credential used to authenticate the outgoing email account.
Enter your mailbox password or the app-specific password required by your provider.
The field shown in the screenshot is empty and includes the instruction:
Leave blank to keep the current saved password.
This is important when editing an existing working setup.
If the password is already saved and you are only changing the SMTP host or sender name, you can leave this field empty to preserve the saved password.
For a new connection, enter the required credential.
Do not use your WordPress administrator password unless it also happens to be the correct mailbox credential, which is normally not the case.
Step 6: Configure SMTP Sender Identity
Below the server connection fields, WPMailDesk provides the Sender Identity section.
This controls the sender information attached to outgoing messages.
From Email

Screenshot example: sales@wpmaildesk.com
The From Email is the email address recipients see as the sender.
Enter an address your configured SMTP account is authorized to send from.
For example, a customer support website might use support@example.com.
Using a sender address that is not permitted by the authenticated mailbox or domain can cause mail server rejection or email authentication problems.
From Name

Screenshot example: Example Store
The From Name is the human-readable name displayed alongside the sender email.
For example, a customer might receive a message showing:
WPMailDesk Sales
instead of seeing only the email address.
For a dedicated support mailbox, a name such as Example Company Support is often clearer.
Reply-to / Support Email

Screenshot example: support@example.com
This field determines which reply address is included in outgoing messages using that setting.
You can use the same address as the From Email or configure a different reply mailbox when appropriate.
For example:
From Email: notifications@example.com
Reply-to / Support Email: support@example.com
With this arrangement, the message can be sent from the notification address while directing customer replies to the support mailbox.
Make sure the Reply-to address is monitored and properly configured if you expect WPMailDesk to process incoming replies.
Save and Verify SMTP Settings
After filling in the fields, save the configuration using the page’s save controls.
Then send a real test message to an email account you can access.
Check that:
- The message arrives.
- The From Email and From Name are correct.
- Replying sends the response to the intended address.
- The message does not produce an authentication or delivery error.
If you enabled the option for all WordPress and WooCommerce email, test an appropriate WordPress transactional notification as well.
Step 7: Configure Incoming IMAP
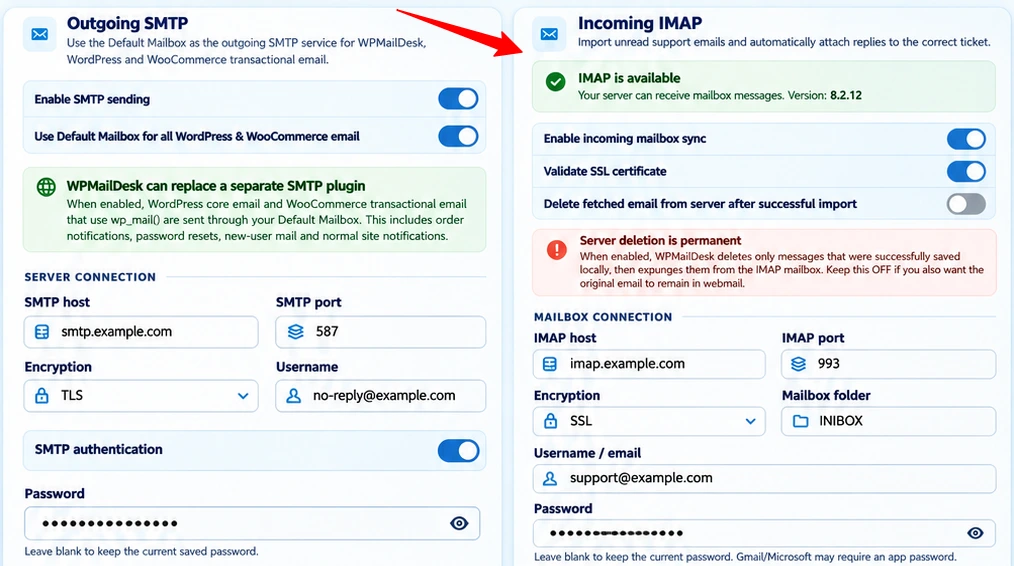
The Incoming IMAP panel appears on the right side of WPMailDesk Settings.
IMAP is responsible for retrieving messages from the connected mailbox.
The panel description states that WPMailDesk imports unread support emails and automatically attaches replies to the correct ticket.
This is what allows an ordinary email conversation to become part of the WPMailDesk support workflow.
Verify PHP IMAP Availability
At the top of the Incoming IMAP panel, the screenshot displays a green confirmation:
PHP IMAP is available
This means the server can access mailbox messages through PHP IMAP.
Check this status before enabling synchronization.
Enable Incoming Mailbox Sync
Screenshot setting: Enabled
Turn on Enable incoming mailbox sync to allow WPMailDesk to retrieve unread messages from the connected mailbox.
Once configured, the synchronization process checks the mailbox according to the selected schedule.
Depending on the message and existing ticket information, a retrieved email may create a new support ticket or be attached to an existing conversation.
Keep this enabled for mailboxes that should receive customer support requests.
Validate SSL Certificate
Screenshot setting: Enabled
This option checks the mail server’s SSL certificate when establishing the secure IMAP connection.
Keeping validation enabled helps protect the connection against invalid or untrusted certificates.
If an IMAP connection fails because of a certificate error, verify the server hostname, certificate, and hosting configuration rather than immediately disabling verification.
The recommended setup for a properly configured mail server is to leave this option enabled.
Delete Fetched Email From Server After Successful Import
Screenshot setting: Enabled
This setting requires special attention.
When enabled, WPMailDesk deletes messages from the IMAP mailbox after they have been successfully saved locally.
The warning in the Settings page explains that server deletion is permanent.
For example, imagine a customer sends an inquiry to your support email address.
WPMailDesk retrieves the email, saves the message into its local support records, and then deletes the original message from the connected server mailbox if this option is enabled and the import was successful.
This can reduce mailbox storage usage and prevent imported messages from remaining in the inbox.
However, it also means the original email may no longer be available in webmail or other email applications.
Recommended for most new setups: Leave this option disabled until you have confirmed that ticket imports, attachments, message history, and backups work as expected.
Enable server deletion only when you intentionally want WPMailDesk to become the primary record of imported messages and understand the retention consequences.
Step 8: Enter the IMAP Mailbox Connection Details
Under Mailbox Connection, WPMailDesk provides the following fields.
IMAP Host
Screenshot example: imap.example.com
Enter the incoming mail server hostname provided by your hosting company.
This is normally different from the SMTP host, although both are part of the same mailbox service.
The IMAP host tells WPMailDesk where to connect to retrieve incoming email.
IMAP Port
Screenshot example: 993
Port 993 is commonly used for secure IMAP connections over TLS.
The screenshot pairs this port with SSL encryption.
If your hosting provider supplies different connection instructions, use the supported settings from that provider.
Encryption
Screenshot setting: SSL
Choose the incoming mailbox encryption type supported by your host.
The example uses SSL with IMAP port 993.
Avoid connecting to mail services without encryption when a secure connection is available.
Mailbox Folder
Screenshot setting: INBOX
The Mailbox Folder determines which folder WPMailDesk should read.
INBOX is the standard folder for newly received messages and is the usual choice for a customer support mailbox.
If your provider uses a different folder structure, enter the correct mailbox folder name.
For a normal support setup, leave this value as INBOX.
Username / Email
Screenshot example: support@example.com
Enter the username required to access the incoming mailbox.
For many providers, this is the complete email address.
The mailbox should be the account that actually receives customer support messages.
Password
Enter the password required to log in to the incoming mail server.
Like the SMTP field, the IMAP Password field explains that leaving it empty preserves the current saved password.
The screenshot also notes that Gmail or Microsoft accounts may require an app password.
For a new mailbox, enter the valid credential. For an already connected mailbox, leave the field empty if you want to retain the existing saved credential.
Check the IMAP Configuration
The example configuration shown in the screenshot is:
| Field | Example value |
|---|---|
| IMAP Host | imap.example.com |
| IMAP Port | 993 |
| Encryption | SSL |
| Mailbox Folder | INBOX |
| Username / Email | support@example.com |
| Validate SSL Certificate | Enabled |
After entering these values, save the settings.
The important test is whether WPMailDesk can actually retrieve an unread email and process it into the correct support conversation.
Step 9: Set the IMAP Sync Schedule
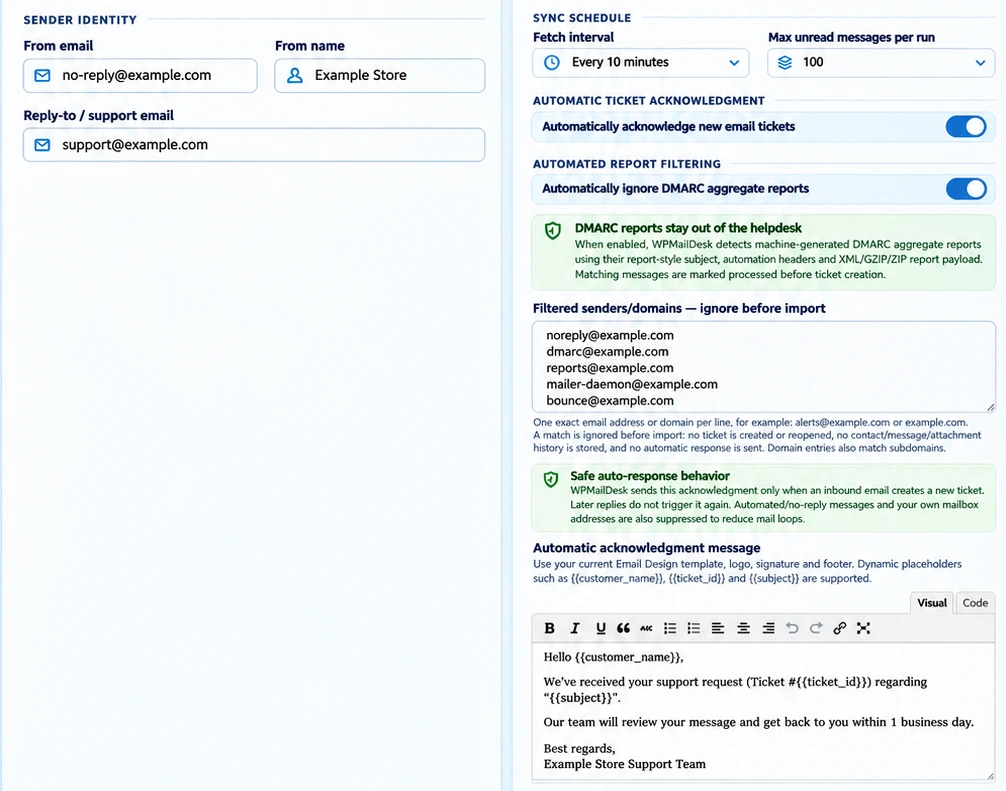
Below the mailbox connection fields, WPMailDesk provides the Sync Schedule section.
This controls the configured mailbox checking interval and the maximum number of unread messages to process during a run.
Fetch Interval
Screenshot setting: Every 15 minutes
The Fetch Interval determines how frequently WPMailDesk is configured to check the mailbox for incoming messages.
With a 15-minute interval, the system is intended to check periodically rather than retrieving every email immediately upon arrival.
The actual execution time can depend on the scheduling system and server conditions.
A shorter interval can make new messages appear sooner, while a longer interval reduces how often the mailbox is checked.
For small and medium support workloads, the screenshot’s 15-minute configuration provides a reasonable starting point.
Max Unread Messages Per Run
Screenshot setting: 25
This field determines the maximum number of unread messages that WPMailDesk should process in a single synchronization run.
With the value set to 25, a run is limited to processing up to 25 unread messages.
For example, if the mailbox contains 60 unread emails, those messages may require multiple runs to be processed.
The appropriate value depends on your email volume and the processing capabilities of your hosting environment.
For a new installation, start with a manageable limit, verify successful imports, and adjust only if the workload requires it.
Step 10: Enable Automatic Ticket Acknowledgement
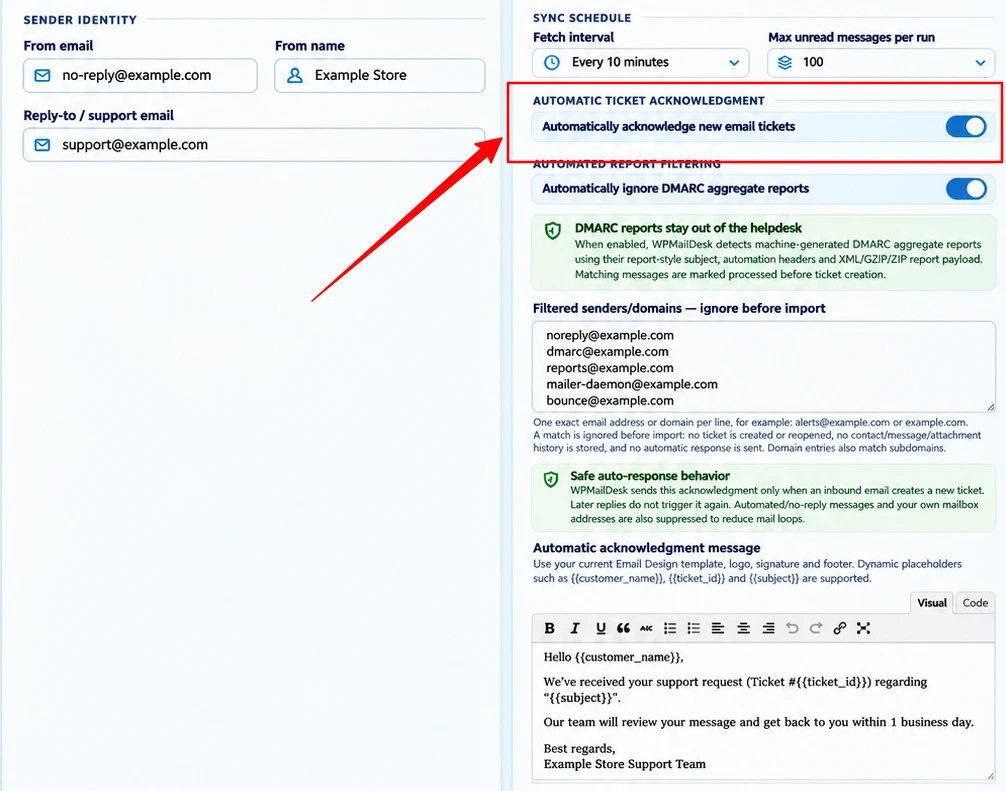
The next section is Automatic Ticket Acknowledgement.
This feature sends an automatic confirmation when an incoming email creates a new support ticket.
It helps customers know that their inquiry has been received.
Automatically Acknowledge New Email Tickets
Screenshot setting: Enabled
Enable this option when you want customers to receive an initial confirmation after a new email ticket has been created.
For example, a customer sends an email with the subject:
Question about my order
WPMailDesk imports the message and creates a ticket.
The automatic acknowledgement can then inform the customer that the message has been received and assigned a ticket reference.
The screenshot also explains an important behavior: acknowledgements are sent for newly created tickets, not for every later reply.
This helps avoid sending the same confirmation repeatedly during an ongoing conversation.
How WPMailDesk Avoids Automatic Reply Loops
The settings page includes a notice named Safe auto-response behavior.
It explains that WPMailDesk suppresses automatic acknowledgements for certain messages, including automated or no-reply messages and messages from the site’s own mailbox addresses.
This matters because automated systems frequently send messages to each other.
Without safeguards, two auto-response systems could repeatedly reply to one another.
WPMailDesk’s acknowledgement behavior is designed to reduce that risk.
Step 11: Configure the Automatic Acknowledgement Message
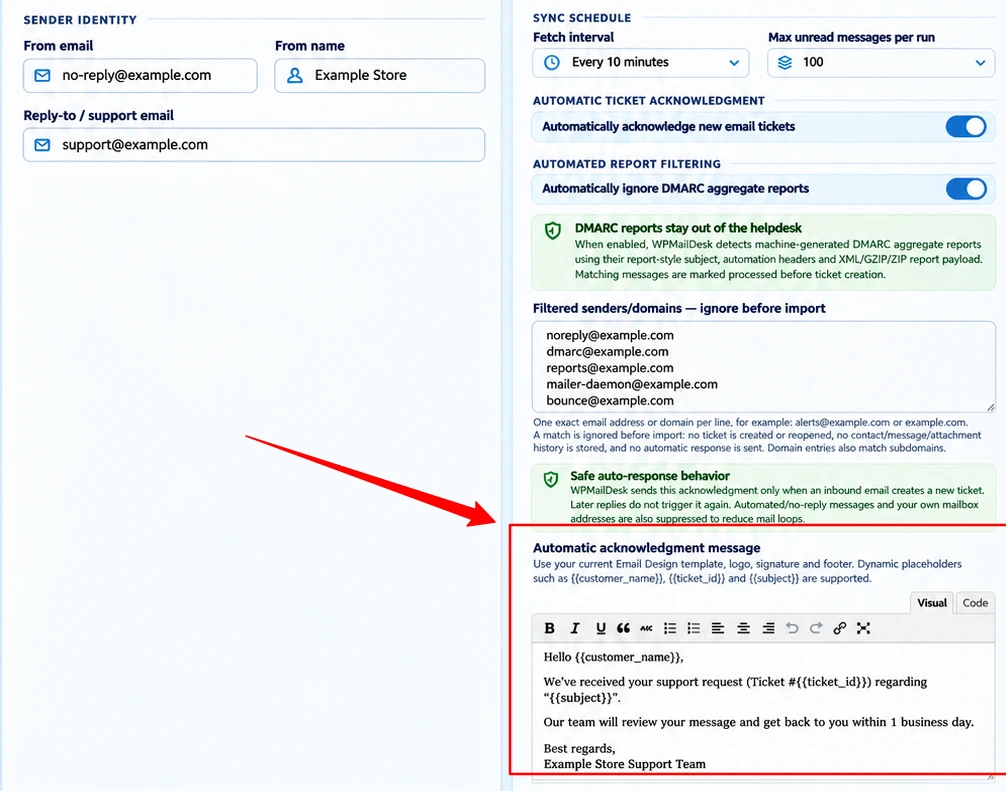
Below the acknowledgement controls, WPMailDesk provides a visual email editor named Automatic Acknowledgement Message.
The editor includes familiar formatting controls such as bold text, italic text, alignment, lists, and links.
You can use the Visual or Code editor mode to prepare the message.
The screenshot explains that WPMailDesk uses the current Email Design template, including the configured logo, signature, and footer.
This means the acknowledgement body does not need to contain a completely separate branded email layout.
Supported Dynamic Placeholders
The screenshot identifies the following placeholders:
| Placeholder | Purpose |
|---|---|
{{customer_name}} |
Customer name |
{{ticket_id}} |
Newly created ticket reference |
{{subject}} |
Email or ticket subject |
These placeholders allow one acknowledgement template to be used for different customers and tickets.
Example Automatic Acknowledgement Message
You can enter the following content in the visual editor:
Hello {{customer_name}},
Thank you for contacting WPMailDesk Support.
We have received your message regarding {{subject}}.
Your support ticket #{{ticket_id}} has been created successfully.
Our team will review your inquiry and respond as soon as possible.
Please keep the ticket reference for future correspondence.
Best regards,
WPMailDesk Support Team
How to Save and Test the Acknowledgement
After writing the message:
- Check the greeting and placeholder spelling.
- Avoid adding a second logo, footer, or signature if the Email Design template already includes them.
- Save the updated acknowledgement settings.
- Send a new support email from an ordinary external mailbox.
- Confirm that WPMailDesk creates a ticket.
- Check whether the confirmation arrives.
- Reply to the same conversation and verify that a second new-ticket acknowledgement is not sent.
An acknowledgement is different from a human support reply. It confirms receipt but does not mean the inquiry has already been resolved.
Step 12: Configure Automatic DMARC Report Filtering
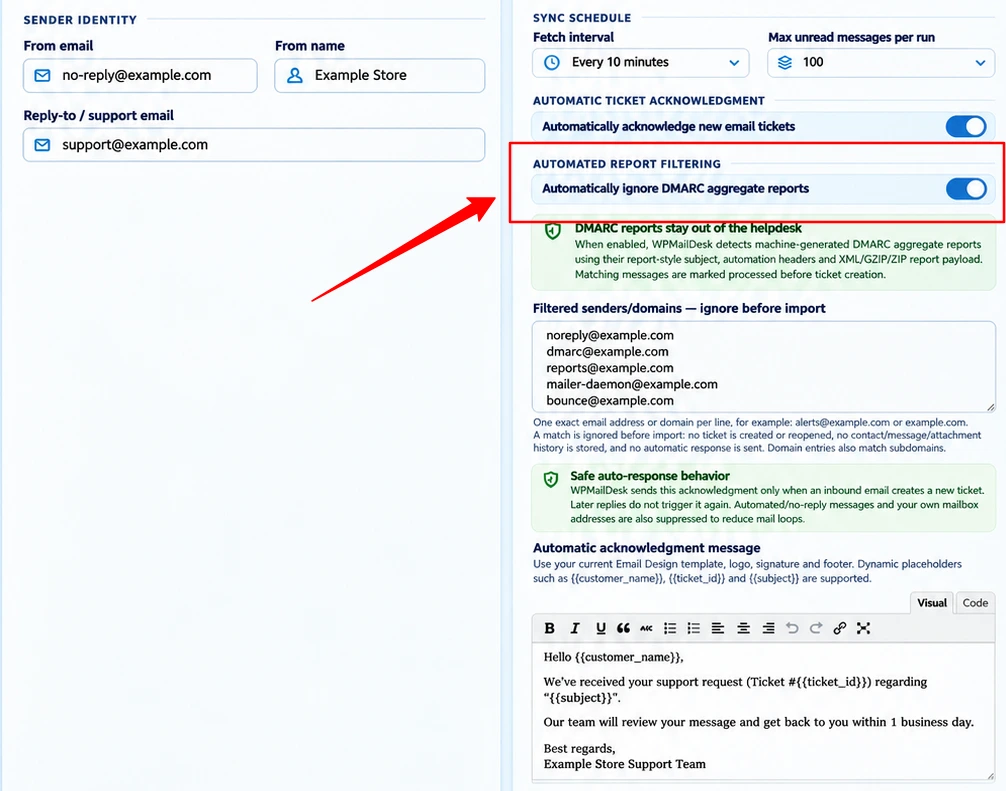
WPMailDesk includes an Automated Report Filtering section.
One of its main controls is:
Automatically ignore DMARC aggregate reports
Screenshot setting: Enabled
DMARC aggregate reports are machine-generated reports about email authentication activity.
They are useful for monitoring domain email authentication, but they are not normal customer support requests.
If these reports arrive in a mailbox connected to a help desk, they can create unnecessary tickets and clutter the customer support queue.
How the DMARC Filter Works
The Settings page explains that WPMailDesk examines indicators associated with machine-generated DMARC aggregate reports.
These include report-style subjects, automation headers, and XML, GZIP, or ZIP report payloads.
When the feature recognizes a message as an automated DMARC aggregate report, it can exclude it from normal ticket processing.
The screenshot also clarifies that ordinary customer messages discussing DMARC are not automatically excluded unless they match the automated-report pattern.
For example:
A customer writes, “Can you help me understand my DMARC settings?”
That is a normal support inquiry and should not be treated as a machine-generated aggregate report merely because it contains the term DMARC.
For a business receiving automated email authentication reports, enabling this filter helps keep the support inbox focused on genuine customer conversations.
Step 13: Configure Filtered Senders and Domains
The next setting is:
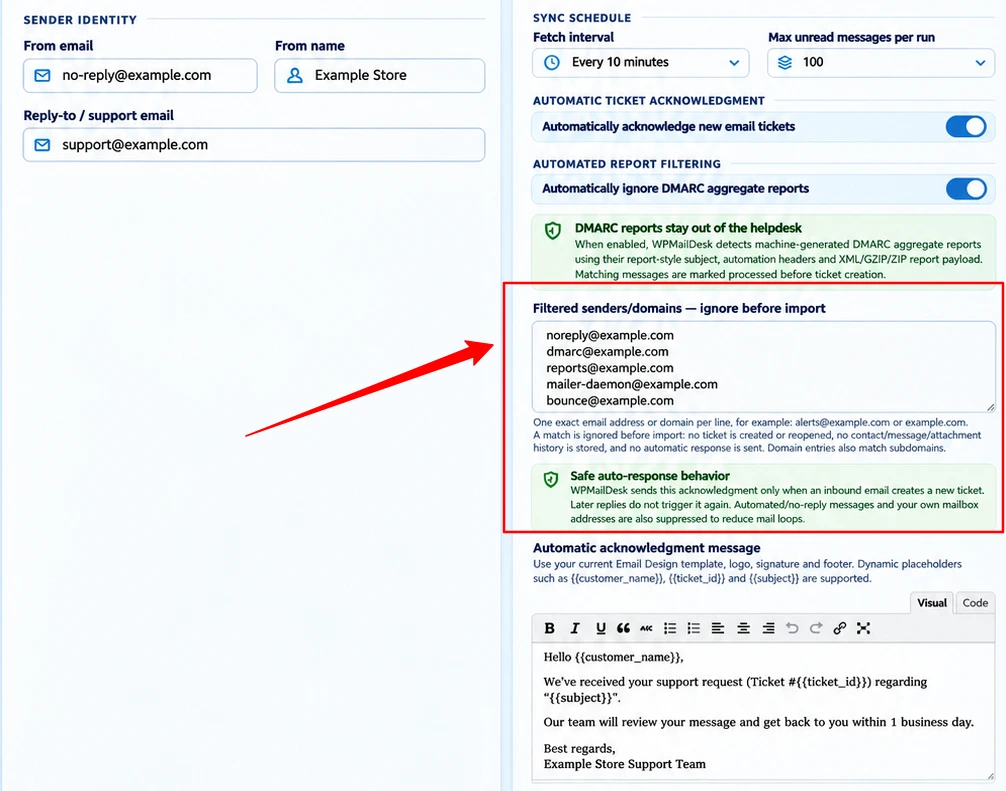
Filtered senders/domains — ignore before import
This field allows you to enter email addresses or domains that WPMailDesk should exclude before creating or updating tickets.
How to Fill In the Filtered Senders Field
Enter one exact email address or domain per line.
For example:
no-reply@example.com
dmarc@example.com
alerts.example.net
Each entry represents a sender or domain you intentionally want WPMailDesk to ignore.
If you enter an individual email address, the rule applies to that address.
If you enter a domain, the setting description states that its subdomains are also matched.
For example, an exclusion for example.com may also cover senders from mail.example.com.
What Happens When a Sender Is Filtered?
The screenshot explains that matching messages are ignored before import.
As a result:
- No ticket is created or reopened for that message.
- No contact, message, attachment, or history entry is stored.
- No automatic acknowledgement is sent.
This behavior is different from simply hiding a message after it has entered the help desk.
The filtered message is excluded from the supported import workflow.
Which Senders Should You Filter?
Good candidates include automated notification sources that should never become support tickets, such as dedicated DMARC report senders or monitored no-reply mailboxes.
Be careful when filtering entire domains.
If you add the domain of a customer or service provider that sends genuine support inquiries, those emails may also be excluded.
Use individual sender addresses wherever possible to avoid blocking legitimate customer correspondence.
After updating the list, save the settings and verify the result with a controlled test.
Step 14: Review the Last Inbox Sync Results
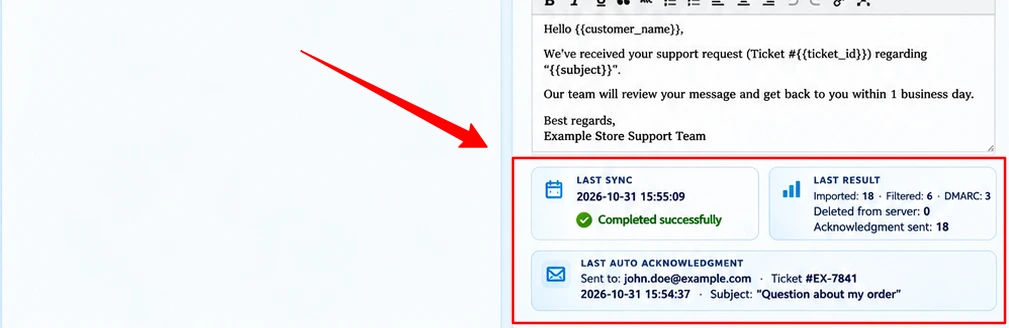
At the bottom of the Incoming IMAP panel, WPMailDesk displays diagnostic information.
These results help you understand what happened during the most recent mailbox synchronization.
Last Sync
This shows the timestamp of the most recent recorded sync.
In the screenshot, the displayed value is:
2026-10-31 12:55:10
If the value does not update as expected, investigate the mailbox connection and scheduling process.
Last Result
The Last Result panel summarizes how messages were handled.
The screenshot shows a result with:
| Result | Value shown |
|---|---|
| Imported | 0 |
| Filtered | 0 |
| DMARC ignored | 0 |
| Skipped | 5 |
| Deleted from server | 0 |
| Acknowledgements sent | 0 |
| Failed | 0 |
These numbers describe the most recent recorded synchronization result.
For example, Imported: 0 means that the reported run did not import any new messages.
Skipped: 5 means that five messages were skipped during that run. The summary alone does not establish the exact reason for each skipped message.
Failed: 0 means that no failures were reported in that summary.
When troubleshooting, look at the combination of results rather than treating one number as proof that the whole mailbox is working or broken.
Last Auto Acknowledgement
The screenshot also shows a Last Auto Acknowledgement panel.
Its example indicates that an acknowledgement was skipped because the sender was recognized as a no-reply or automated mailbox.
This is expected behavior under the safe auto-response rules.
A skipped acknowledgement does not necessarily mean SMTP has failed.
For a meaningful test, use a normal customer email account rather than an automated reporting address.
Step 15: Test the Complete SMTP and IMAP Workflow
After configuring the settings, test the complete process instead of checking only individual connection fields.
Test 1: Outgoing Email
Send an outgoing message through a WPMailDesk workflow.
Confirm that the email arrives and uses the configured sender address and display name.
This checks the SMTP sending side.
Test 2: Incoming Customer Email
From a different, ordinary email account, send a new message to your connected support mailbox.
Use a clear subject such as:
WPMailDesk Test Support Request
Add a short message asking for help.
Make sure the message is available as unread in the configured mailbox folder.
After the next scheduled synchronization, check whether WPMailDesk imports the message and creates the appropriate ticket.
Test 3: Automatic Acknowledgement
If automatic ticket acknowledgement is enabled, check the sender’s inbox for the confirmation.
The email should contain the appropriate customer information and ticket reference.
If no acknowledgement arrives, review the acknowledgement settings, sender filtering, and the Last Auto Acknowledgement result before assuming the outgoing server is broken.
Test 4: Customer Reply Handling
Reply to the support conversation using the same email thread.
After the next sync, check whether WPMailDesk attaches the reply to the existing ticket instead of treating it as a completely unrelated support request.
This confirms that the incoming conversation workflow is operating as expected.
Test 5: Verify the Sync Report
Return to WPMailDesk → Settings.
Review:
- Last Inbox Sync
- Last Result
- Last Auto Acknowledgement
These panels can help you confirm whether the test message was imported, filtered, skipped, or acknowledged.
Troubleshooting Common WPMailDesk Settings Problems
SMTP Is Enabled but Emails Are Not Sending
First, check the SMTP Host, Port, Encryption, Username, and Password fields.
Confirm that your email hosting provider permits authenticated SMTP sending.
If you recently changed your mailbox password, update the saved SMTP credential.
Also check for another WordPress SMTP plugin that may be trying to control the same outgoing mail process.
Incoming Emails Are Not Appearing in WPMailDesk
Check whether Enable incoming mailbox sync is turned on.
Then verify the PHP IMAP availability status, incoming server hostname, port, encryption, mailbox folder, and authentication credentials.
Make sure the email has actually arrived in the mailbox folder being monitored.
Review the Last Sync timestamp and Last Result panel.
Also check the filtered senders list to ensure that the sender or its domain has not been intentionally excluded.
An Email Arrived but No New Ticket Was Created
Not every processed message has to create a new ticket.
A message may be recognized as a reply to an existing conversation, matched by a filtering rule, or skipped for another reason.
Check the existing ticket conversation, filtering settings, and sync result before trying to import the same message again.
Automatic Acknowledgement Was Not Sent
Verify that Automatically acknowledge new email tickets is enabled.
An acknowledgement is designed for newly created tickets rather than every reply.
Messages from automated or no-reply sources and certain other suppressed senders may not receive an acknowledgement.
Review the Last Auto Acknowledgement panel for the recorded outcome.
Customers Are Not Receiving WordPress or WooCommerce Emails
If WPMailDesk is intended to send sitewide email, confirm that Use Default Mailbox for all WordPress & WooCommerce email is enabled.
Check the From Email and SMTP authentication settings.
Then test the actual WordPress or WooCommerce message type that is failing.
Also review whether another mailer plugin or integration sends that message through a separate delivery system.
Recommended WPMailDesk Settings for a New Support Mailbox
For someone configuring WPMailDesk for the first time, a sensible starting arrangement is:
| Setting | Suggested starting configuration |
|---|---|
| SMTP sending | Enabled |
| SMTP authentication | Enabled |
| SMTP encryption | Secure method supplied by host |
| WordPress and WooCommerce SMTP routing | Enable if WPMailDesk will be the primary wp_mail() sender |
| Incoming mailbox sync | Enabled |
| Validate SSL certificate | Enabled |
| Delete fetched email from server | Disabled initially |
| IMAP folder | INBOX |
| Fetch interval | 15 minutes as an initial option |
| Max unread messages per run | 25 as an initial limit |
| Automatic acknowledgement | Enabled for support workflows |
| Ignore DMARC aggregate reports | Enabled if reports reach the support mailbox |
| Filtered senders | Only verified unwanted automated senders |
These are starting recommendations, not universal values. The exact configuration depends on your email provider, mailbox volume, hosting capabilities, and message-retention requirements.
Final Thoughts
WPMailDesk Settings is where the incoming and outgoing parts of your WordPress support system are connected.
SMTP handles the messages your website sends. IMAP allows WPMailDesk to retrieve customer emails. The sync schedule controls mailbox processing, while acknowledgement and filtering options determine how incoming messages are handled.
The most important part of setting up WPMailDesk is verifying the complete workflow: a customer sends an email, WPMailDesk imports it, the ticket is created or updated, and your team can reply through the configured outgoing mail service.
Once that process works reliably, you can expand the setup to additional mailboxes, refine your sender filters, and adjust synchronization settings according to your support workload.